
Create a Local VM on Windows
On Windows you can run a meltcloud Nest or Machine as a local VM using Hyper-V or VMware Workstation.
Recommendation
Hyper-V is the quickest way to get started: it is built into Windows and requires no additional software. It works well for quick experimentation, exploring the Foundry UI, and adding Machines. However, its Default Switch has known limitations that make it less suitable for persistent setups.
For a more persistent setup, we recommend VMware Workstation. Its NAT network provides stable IPs across reboots and works with WSL out of the box. VMware Workstation is free, but requires navigating Broadcom's support portal and creating an account to download.
Hyper-V
Hyper-V is built into Windows 10/11 Pro, Enterprise, and Education editions. It is the fastest way to get a VM running for quick experimentation.
Known Limitations (Hyper-V Default Switch)
The Hyper-V Default Switch has two limitations that affect local Nest setups:
- Nest breaks after host reboot. The Default Switch changes its subnet on every reboot, so the Nest's static IP becomes invalid. See Troubleshooting: Nest Breaks After Host Reboot (Hyper-V) for a workaround using a NAT switch.
- Nest is not reachable from WSL. WSL cannot directly reach VMs on the Default Switch. See Troubleshooting: Reaching the Nest from WSL (Hyper-V) for workarounds.
For exploring the Foundry UI from Windows, adding Machines, and general experimentation, the Default Switch works fine. For a more persistent setup, consider VMware Workstation instead.
VM Settings (Hyper-V)
| Setting | Nest | Machine |
|---|---|---|
| Generation | Generation 2 (UEFI) | Generation 2 (UEFI) |
| vCPU | 4+ | 2+ |
| RAM | 10 GiB+ | 4 GiB+ |
| Disk | ≥ 200 GiB | ≥ 30 GiB (depends on the amount of container images) |
| Networking | Default Switch | Default Switch |
| Nested virtualization | not required | optional, required for Elastic Node Pools |
| Boot media | Nest installer .iso | Enrollment Image .iso (amd64) |
Option A: PowerShell
Enable Hyper-V
Open an elevated PowerShell and run:
Enable-WindowsOptionalFeature -Online -FeatureName Microsoft-Hyper-V -AllReboot when prompted. Hyper-V is available on Windows 10/11 Pro, Enterprise, and Education editions.
Create the VM
# create a Generation 2 VM with 200 GiB disk (PowerShell's GB suffix = GiB)
New-VM -Name "melt-nest" -Generation 2 `
  -MemoryStartupBytes 10GB `
  -NewVHDPath "C:\HyperV\melt-nest.vhdx" `
  -NewVHDSizeBytes 200GB `
  -SwitchName "Default Switch"

Set-VM -Name "melt-nest" -ProcessorCount 4
Set-VMMemory -VMName "melt-nest" -DynamicMemoryEnabled $false

# disable Secure Boot so the VM can boot the .iso
Set-VMFirmware -VMName "melt-nest" -EnableSecureBoot Off

# remove the default empty DVD drive, add one with the ISO, and boot from it
Get-VMDvdDrive -VMName "melt-nest" | Remove-VMDvdDrive
Add-VMDvdDrive -VMName "melt-nest" -Path "C:\path\to\nest-installer-v*-amd64.iso"
$dvd = Get-VMDvdDrive -VMName "melt-nest"
Set-VMFirmware -VMName "melt-nest" -FirstBootDevice $dvd

Start-VM -Name "melt-nest"

# open the VM console
vmconnect localhost "melt-nest"# create a Generation 2 VM with 30 GiB disk (PowerShell's GB suffix = GiB)
$vmName = "melt-machine"
New-VM -Name $vmName -Generation 2 `
-MemoryStartupBytes 8GB `
-NewVHDPath "C:\HyperV\$vmName.vhdx" `
-NewVHDSizeBytes 30GB `
-SwitchName "Default Switch"
Set-VM -Name $vmName -ProcessorCount 2
Set-VMMemory -VMName $vmName -DynamicMemoryEnabled $false
# disable Secure Boot so the VM can boot the .iso
Set-VMFirmware -VMName $vmName -EnableSecureBoot Off
# remove the default empty DVD drive, add one with the ISO, and boot from it
Get-VMDvdDrive -VMName $vmName | Remove-VMDvdDrive
Add-VMDvdDrive -VMName $vmName -Path "C:\path\to\enrollment-image-amd64.iso"
$dvd = Get-VMDvdDrive -VMName $vmName
Set-VMFirmware -VMName $vmName -FirstBootDevice $dvd
Start-VM -Name $vmName
# open the VM console
vmconnect localhost $vmName# create a Generation 2 VM with 30 GiB disk (PowerShell's GB suffix = GiB)
# change the name to create multiple machines (e.g. worker1, worker2)
$vmName = "melt-machine"
New-VM -Name $vmName -Generation 2 `
-MemoryStartupBytes 8GB `
-NewVHDPath "C:\HyperV\$vmName.vhdx" `
-NewVHDSizeBytes 30GB `
-SwitchName "Default Switch"
Set-VM -Name $vmName -ProcessorCount 2
Set-VMMemory -VMName $vmName -DynamicMemoryEnabled $false
# disable Secure Boot so the VM can boot the .iso
Set-VMFirmware -VMName $vmName -EnableSecureBoot Off
# enable nested virtualization for Elastic Node Pools
Set-VMProcessor -VMName $vmName -ExposeVirtualizationExtensions $true
# remove the default empty DVD drive, add one with the ISO, and boot from it
Get-VMDvdDrive -VMName $vmName | Remove-VMDvdDrive
Add-VMDvdDrive -VMName $vmName -Path "C:\path\to\enrollment-image-amd64.iso"
$dvd = Get-VMDvdDrive -VMName $vmName
Set-VMFirmware -VMName $vmName -FirstBootDevice $dvd
Start-VM -Name $vmName
# open the VM console
vmconnect localhost $vmNameOption B: Hyper-V Manager
Enable Hyper-V
- Open Settings → Apps → Optional Features → More Windows Features.
- Check Hyper-V and click OK.
- Reboot when prompted.
Hyper-V is available on Windows 10/11 Pro, Enterprise, and Education editions.
Create the VM
Open Hyper-V Manager and click New → Virtual Machine in the right panel.
Name: give the VM a name (e.g.
melt-nestormelt-machine).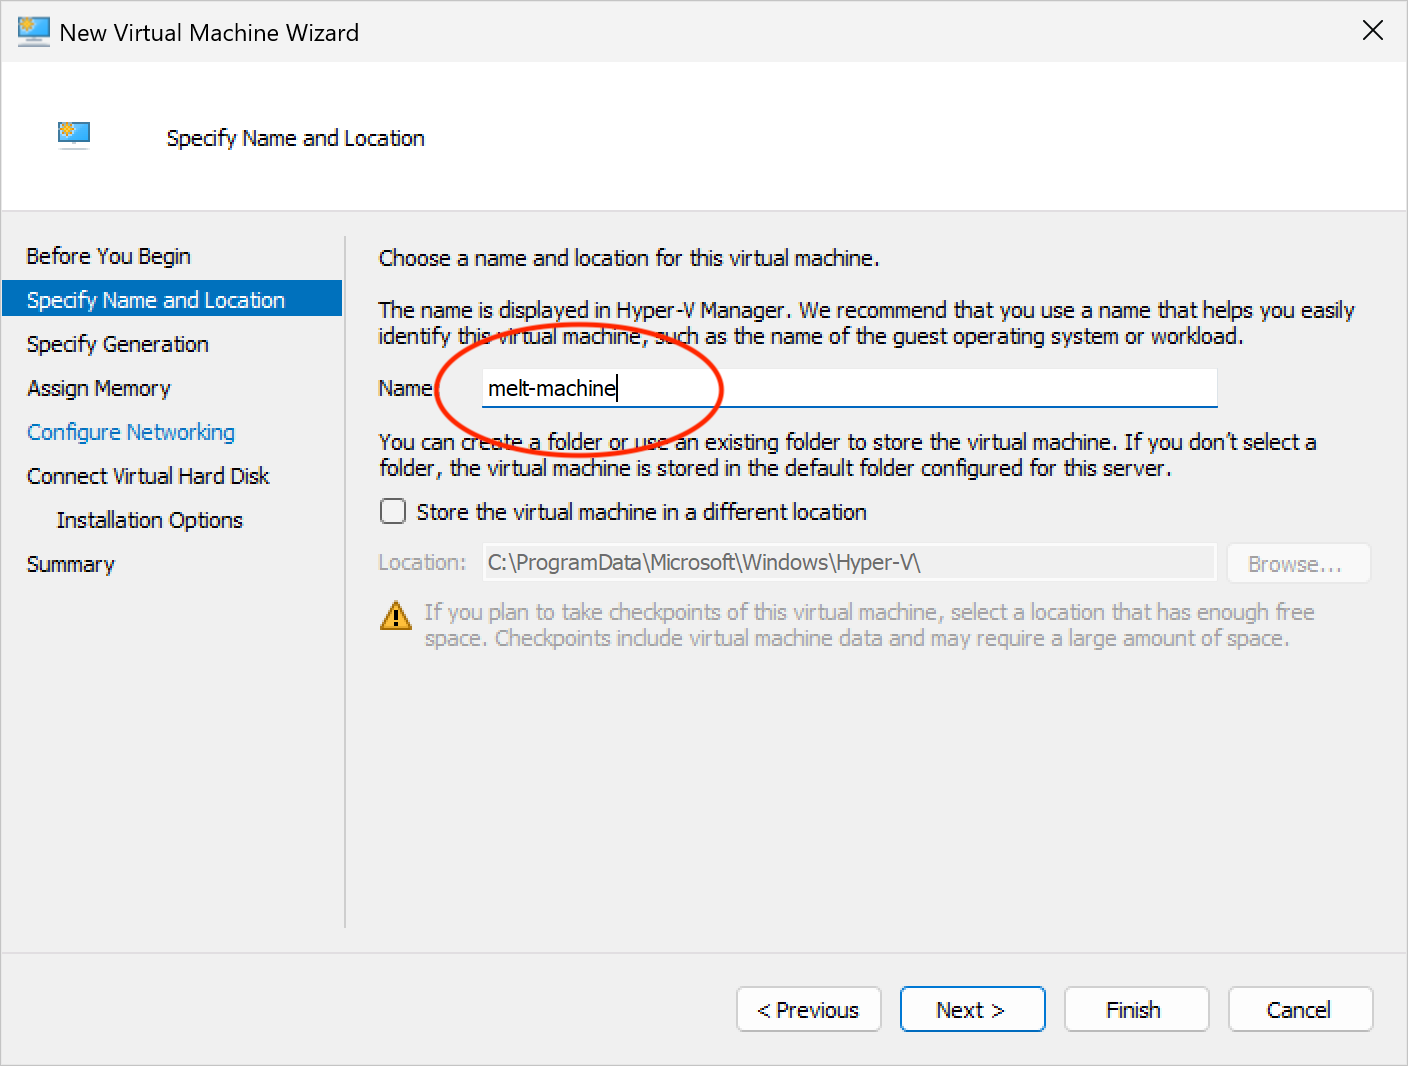
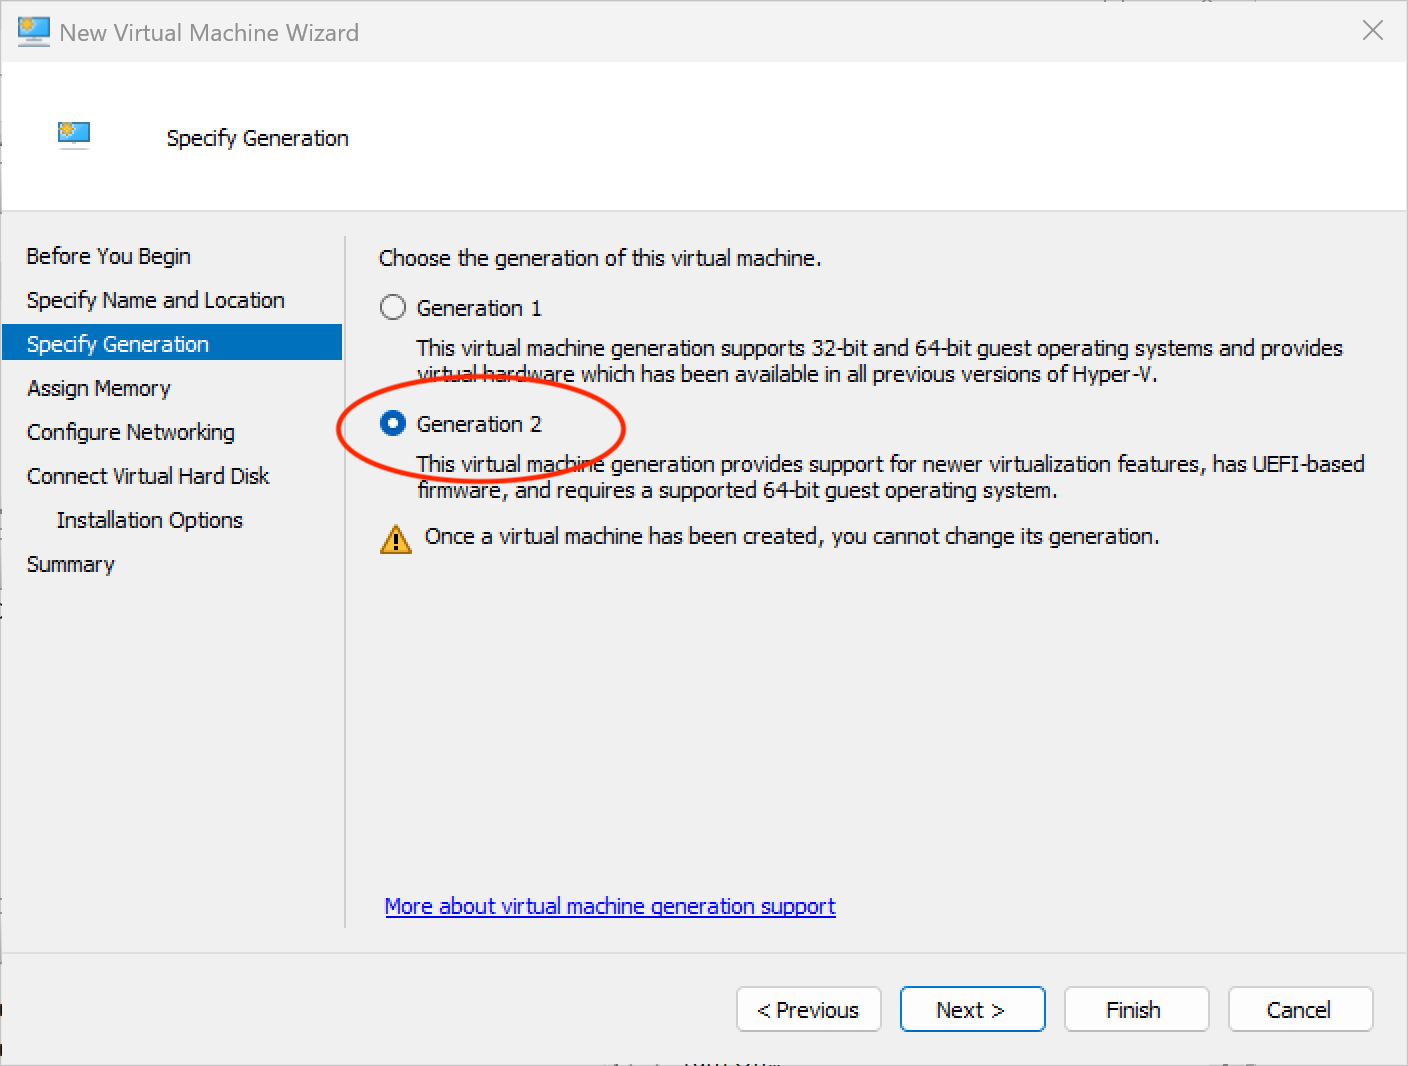
Generation: select Generation 2.
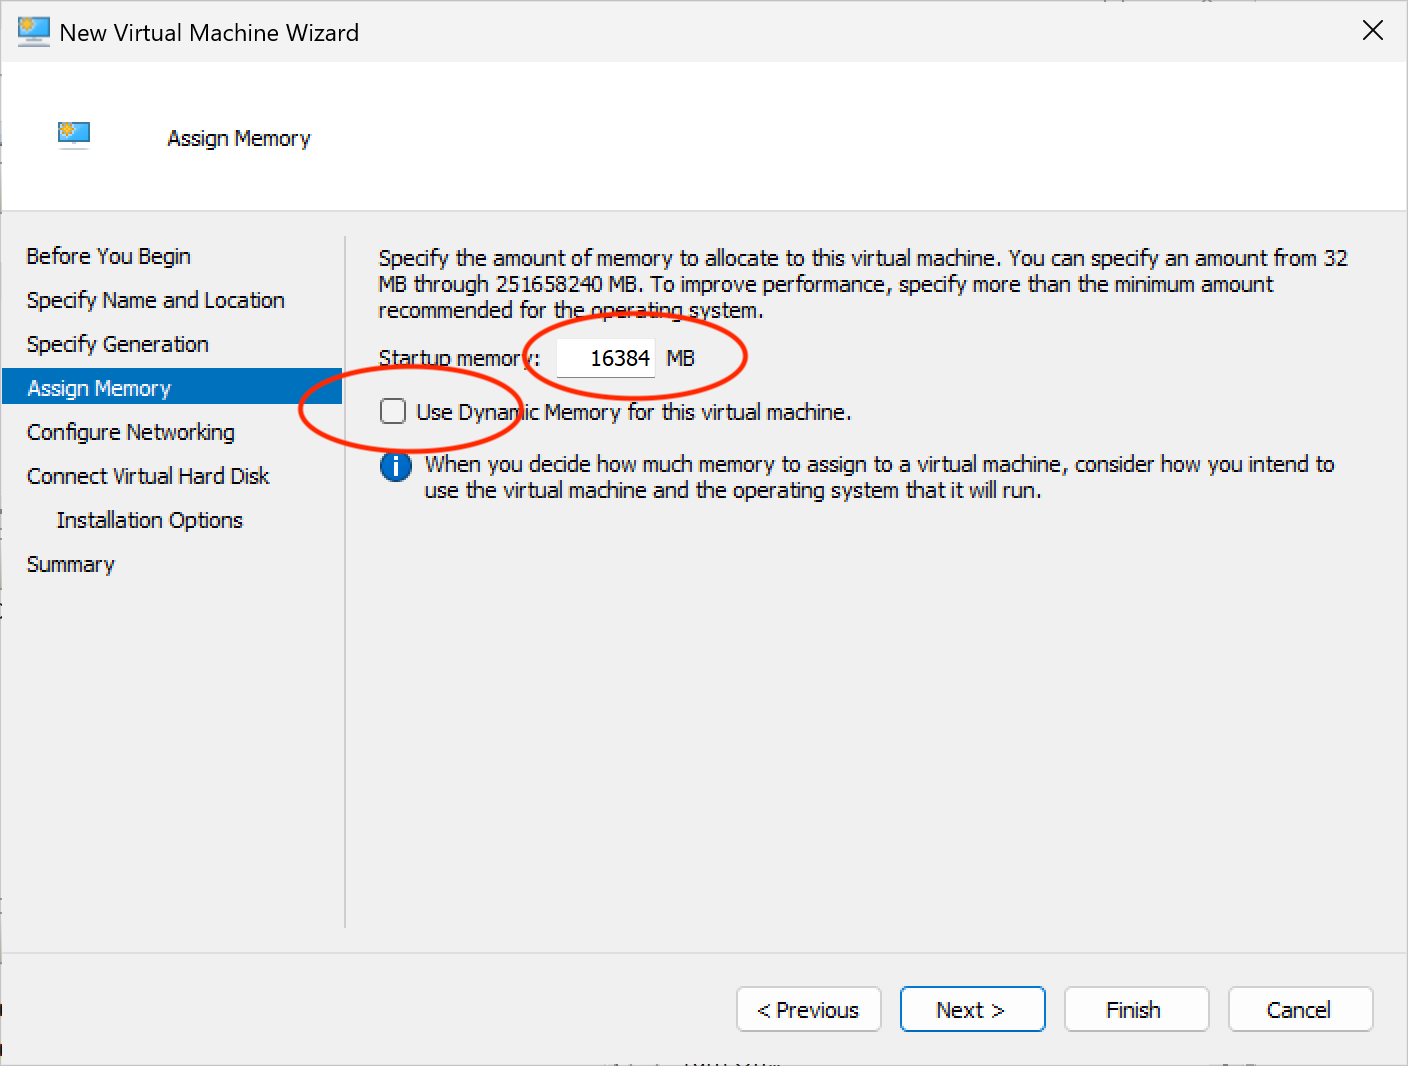
Memory: set the startup memory (see VM Settings (Hyper-V) above). Uncheck Use Dynamic Memory for this virtual machine.
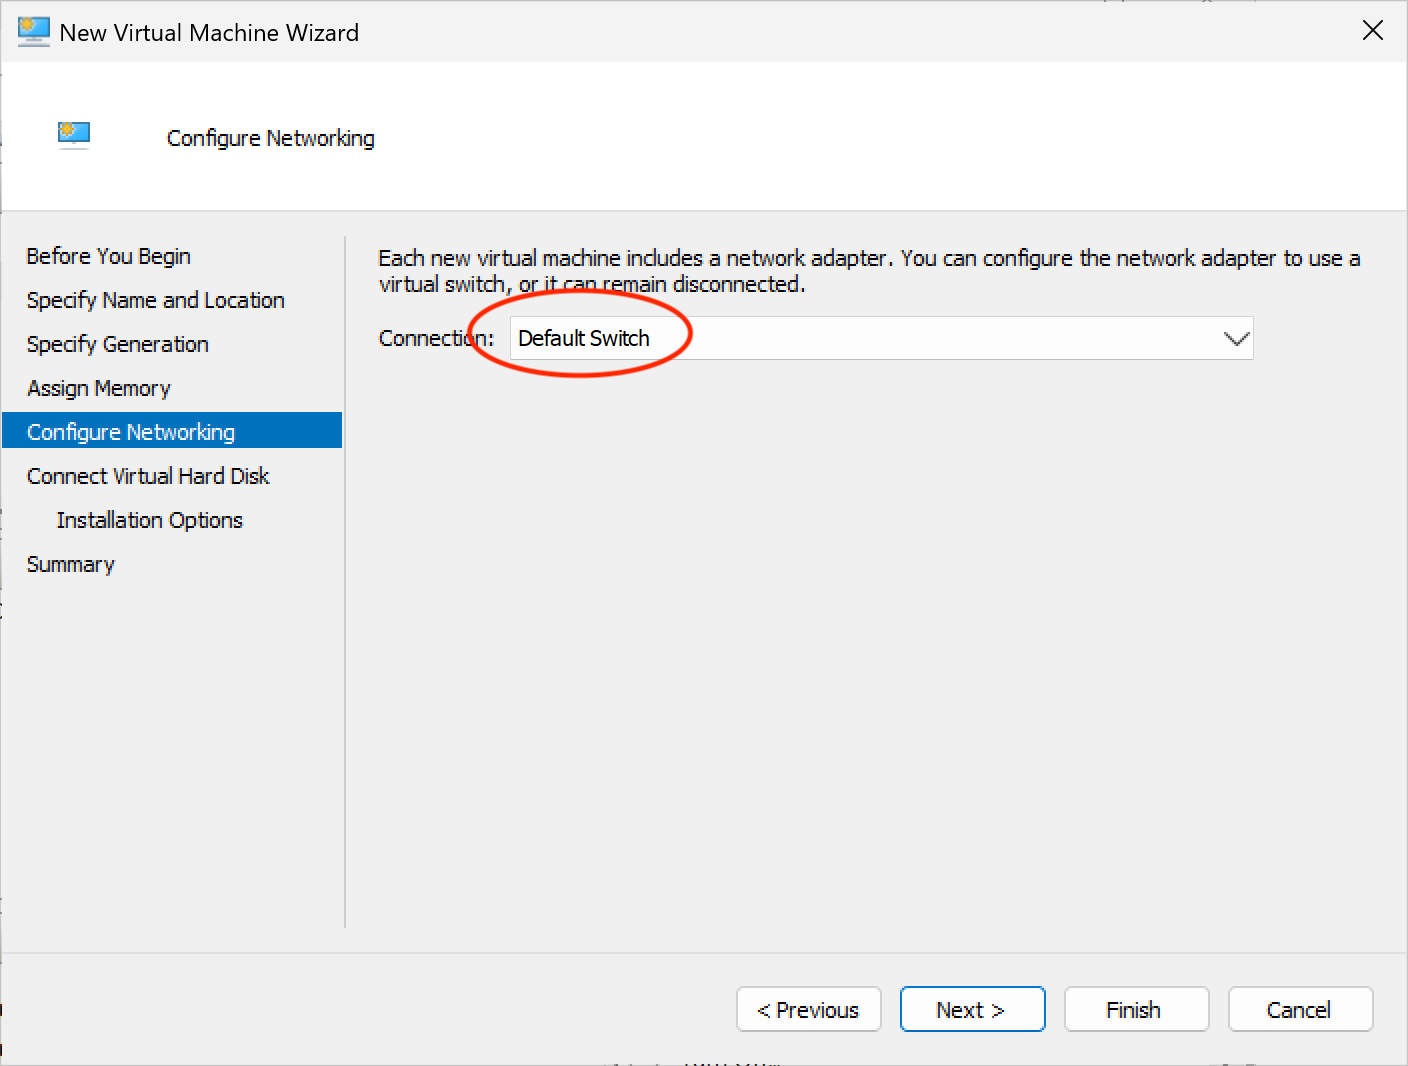
Networking: select Default Switch.
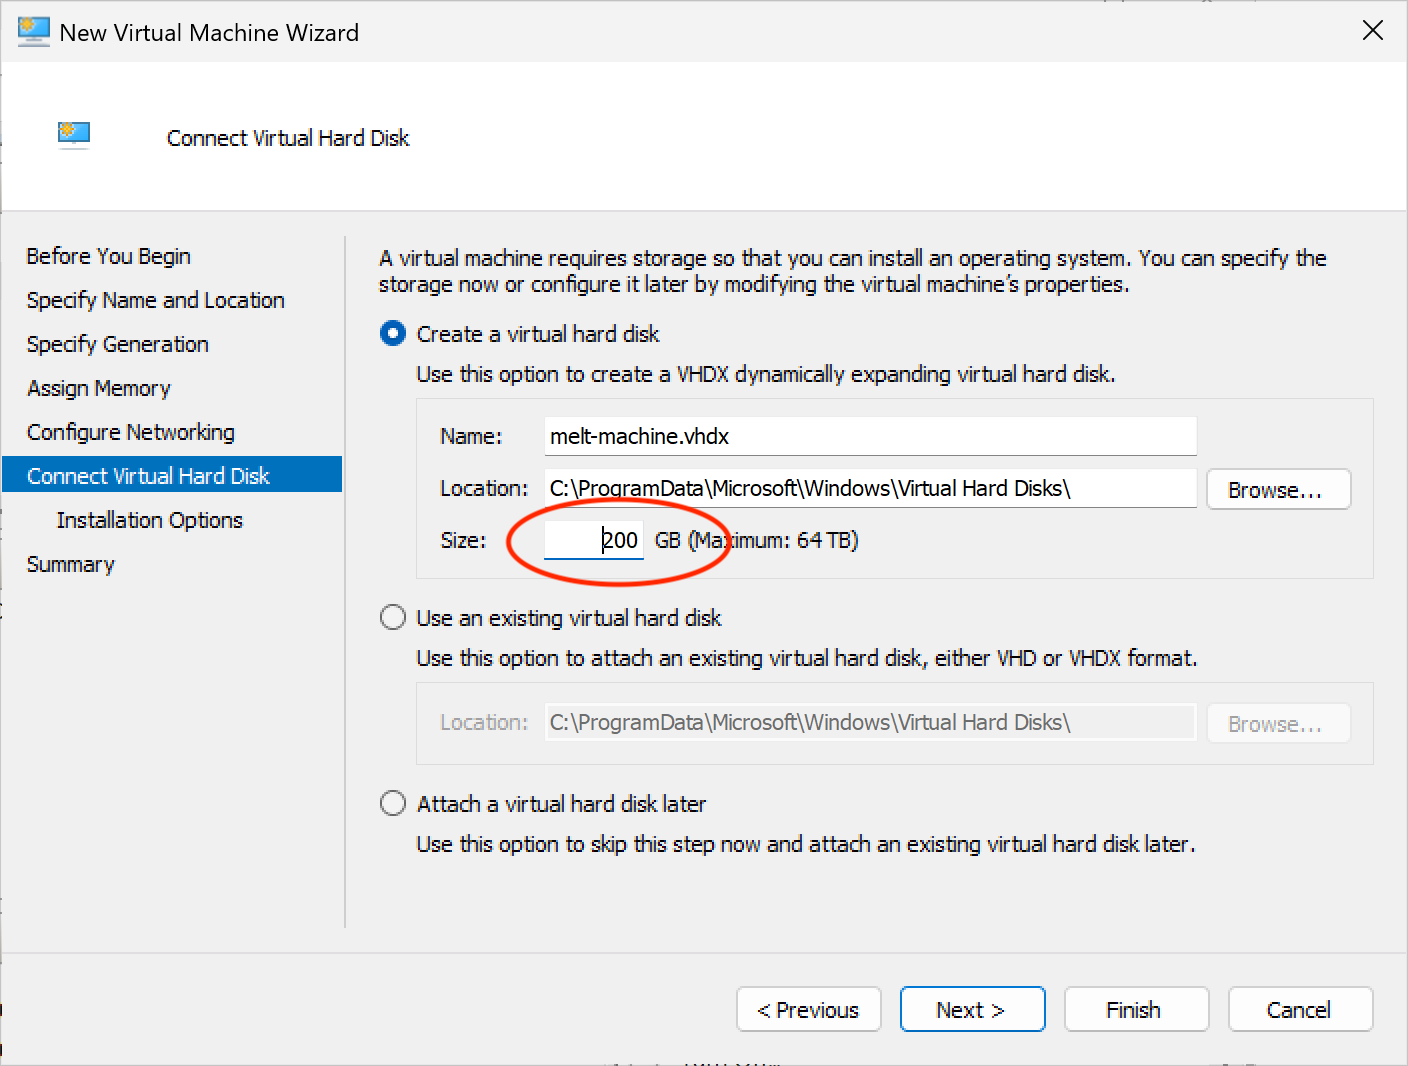
Virtual Hard Disk: create a new disk with the size from the table above.
Installation Options: select Install an operating system from a bootable image file and browse to your
.iso(Nest installer or Enrollment Image).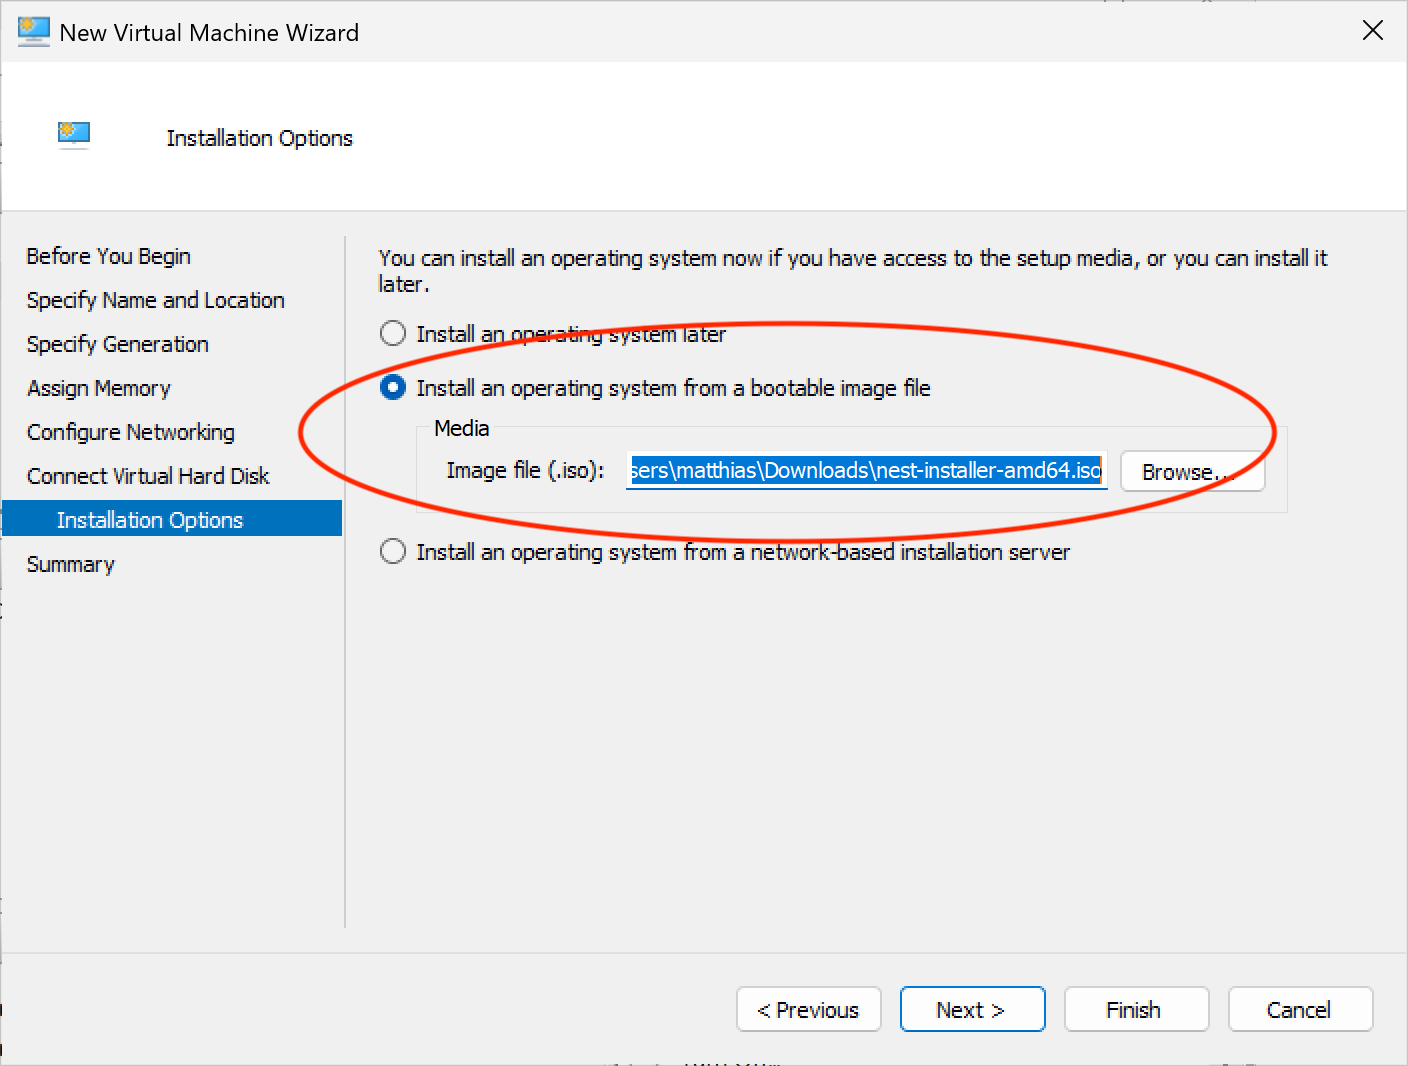
Click Finish.
Before starting the VM, right-click it and open Settings:
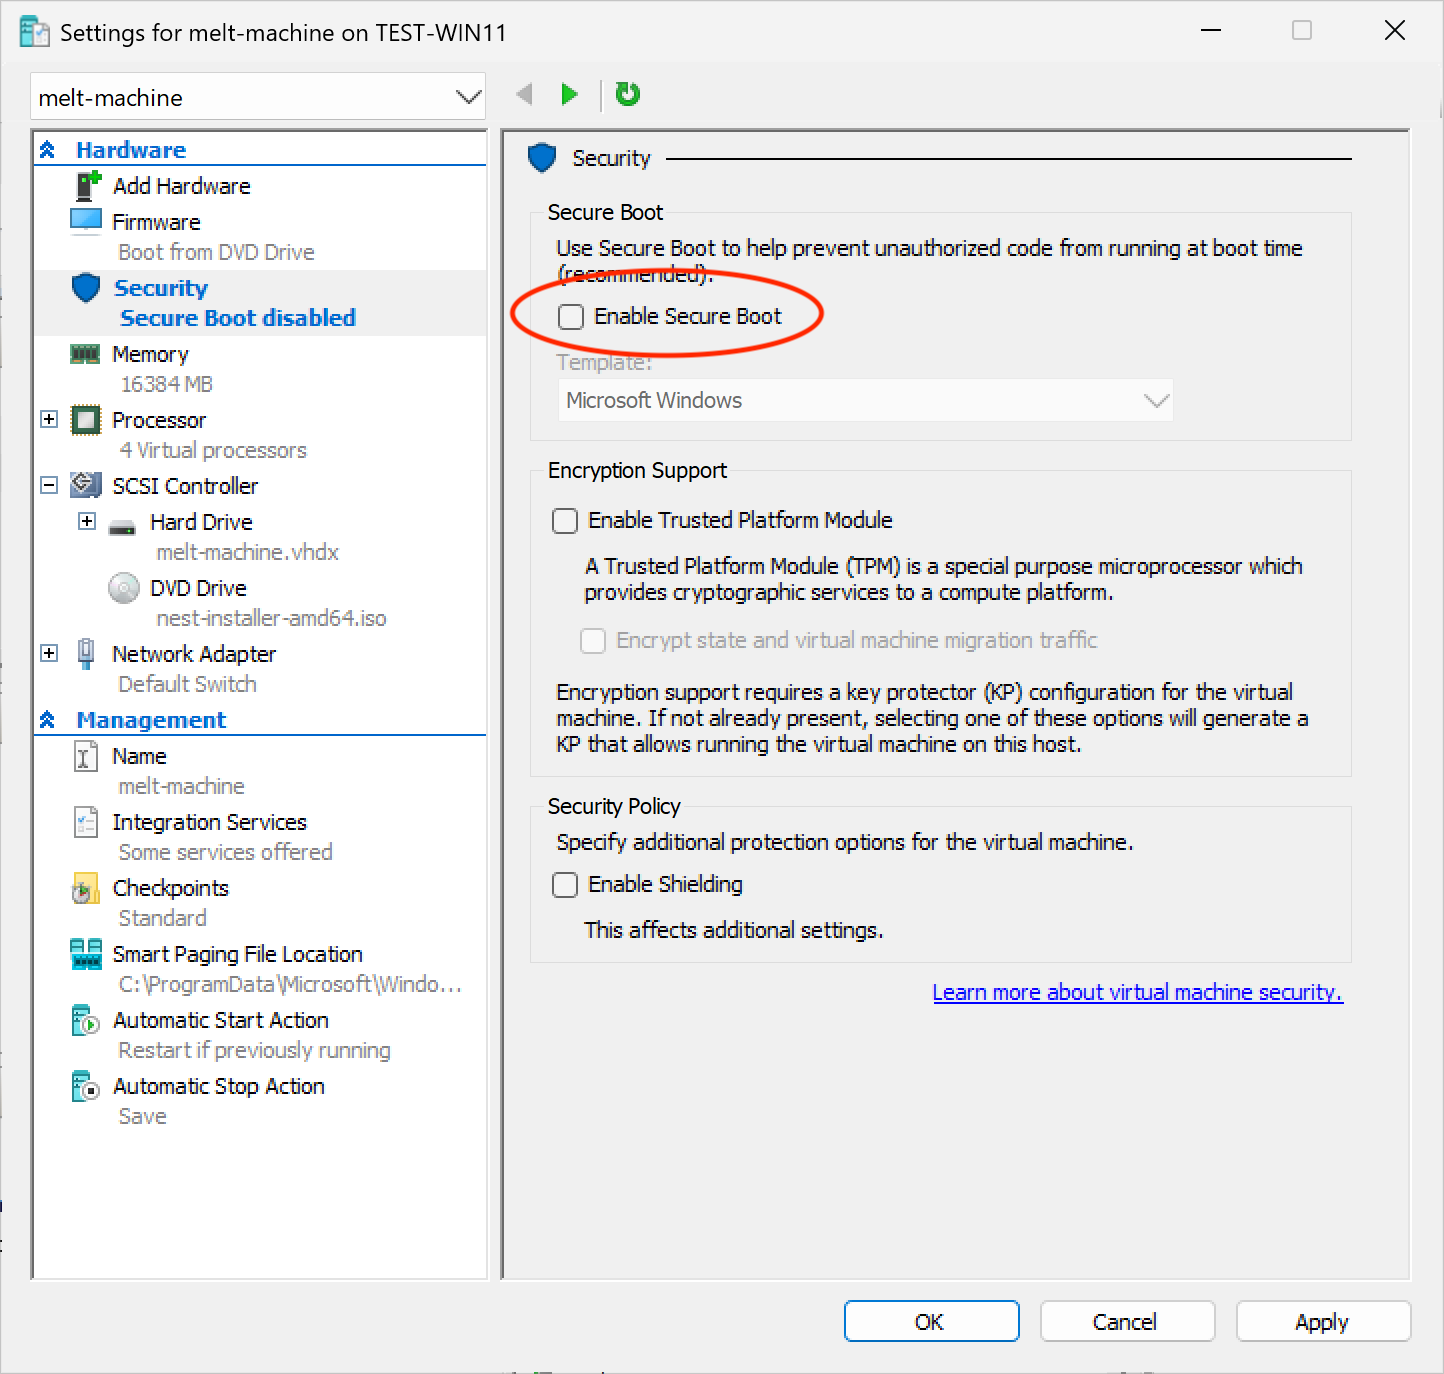
Security: uncheck Enable Secure Boot.
Processor: set the number of virtual processors (see VM Settings (Hyper-V) above).
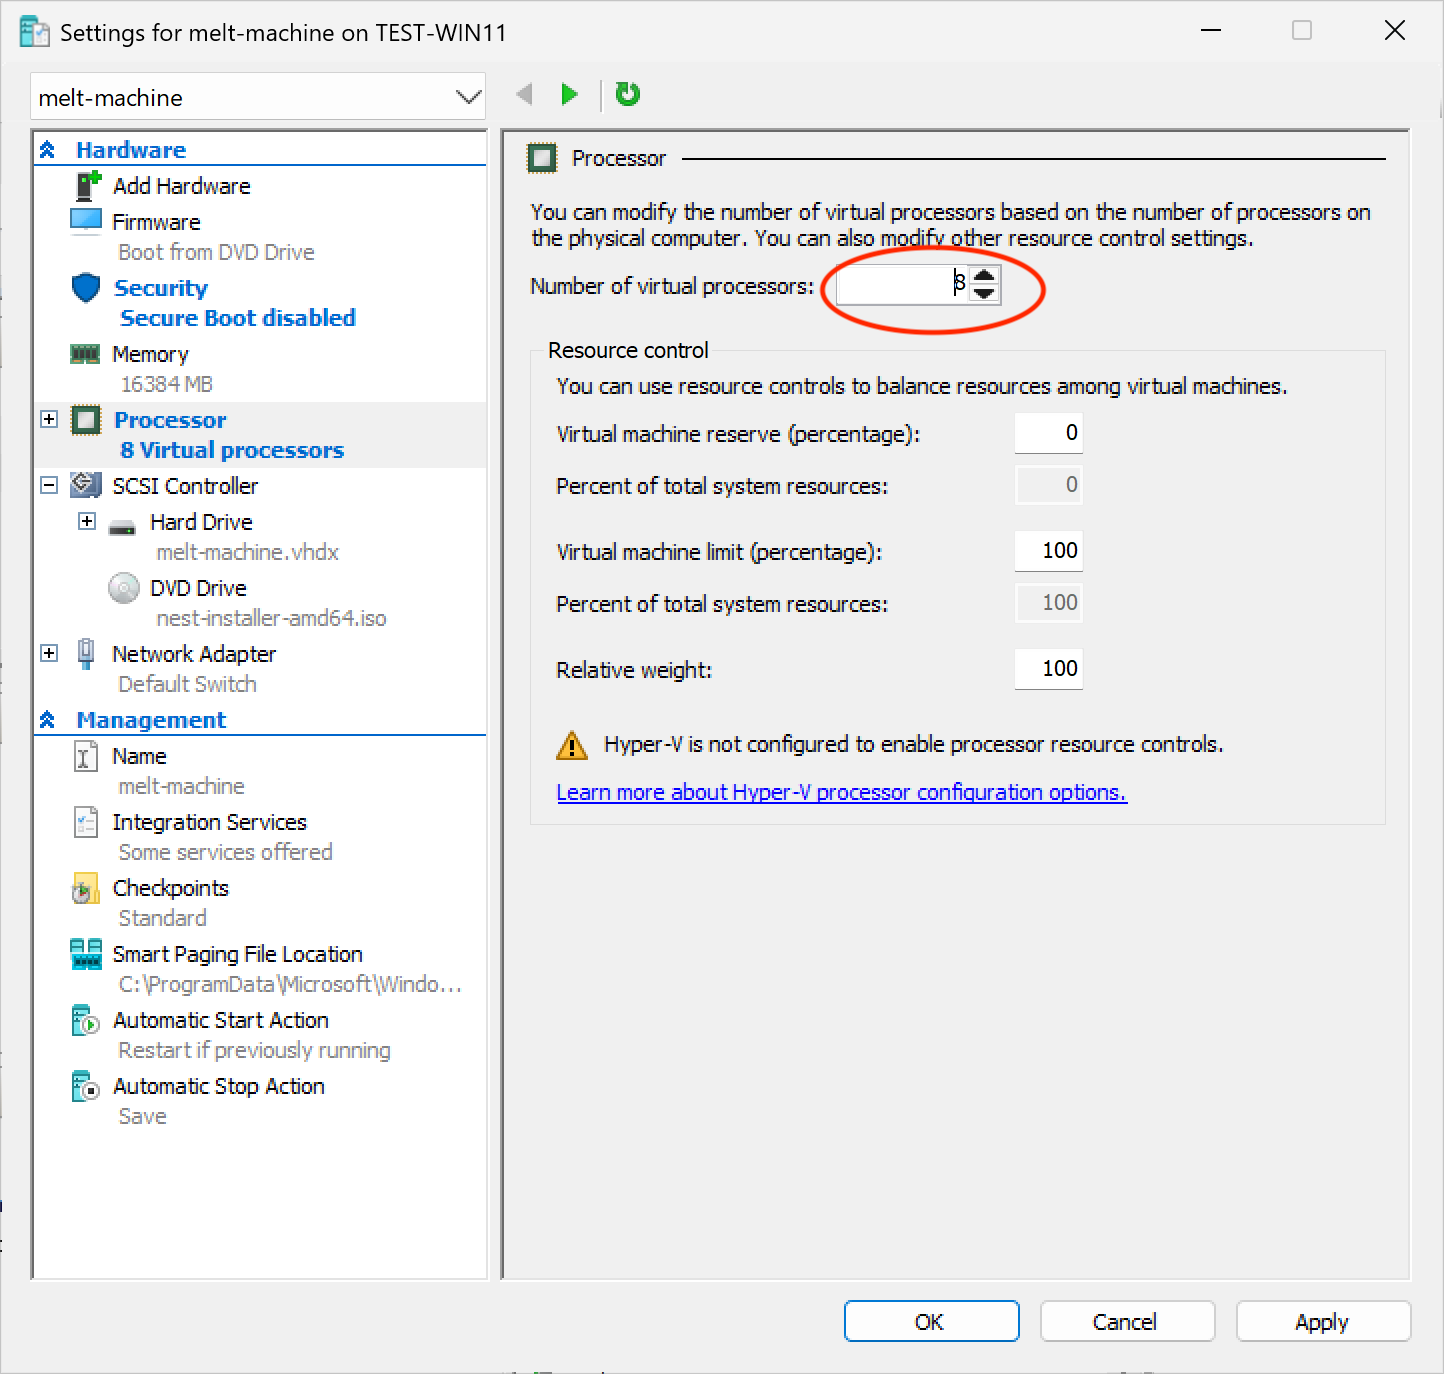
Click Apply to save the settings.
Nested virtualization (Elastic Node Pools)
For Machines that will host Elastic Node Pools, nested virtualization must be enabled via PowerShell (there is no GUI toggle):
Set-VMProcessor -VMName "melt-machine" -ExposeVirtualizationExtensions $trueStart the VM.
Next Steps (Hyper-V)
- Nest: follow the on-screen TUI installer.
- Machine: after it boots from the Enrollment Image it enrolls automatically and appears under Machines. Continue with Assign to a Machine Pool.
VMware Workstation
VMware Workstation does not have the Default Switch limitations of Hyper-V: its NAT network uses a fixed subnet that persists across reboots, and WSL can reach VMs on it. This makes it the better choice for persistent setups where the Nest should survive reboots and be reachable from WSL for terraform, kubectl, etc.
VMware Workstation is free for personal use. Download it from Broadcom's support portal (requires creating an account).
VM Settings (VMware Workstation)
| Setting | Nest | Machine |
|---|---|---|
| Guest OS | Other Linux 6.x kernel 64-bit | Other Linux 6.x kernel 64-bit |
| Firmware | UEFI | UEFI |
| vCPU | 4+ | 2+ |
| RAM | 10 GiB+ | 4 GiB+ |
| Disk | ≥ 200 GiB | ≥ 30 GiB (depends on the amount of container images) |
| Networking | NAT | NAT |
| Nested virtualization | not required | optional, required for Elastic Node Pools |
| Boot media | Nest installer .iso | Enrollment Image .iso (amd64) |
Create the VM
- Create a new VM. When prompted for the guest operating system, select Other Linux 6.x kernel 64-bit. This enables UEFI boot support.
- Set Memory and Processors per the table above.
- Set the Disk size per the table above.
- For Network Adapter, select NAT.
- For CD/DVD, select Use ISO image file and browse to your
.iso(Nest installer or Enrollment Image). - Before starting the VM, open VM Settings → Options → Advanced → Firmware type and select UEFI.
- Start the VM.
During the Nest installation, the installer detects the VMware NAT subnet and suggests matching settings.
Next Steps (VMware Workstation)
- Nest: follow the on-screen TUI installer.
- Machine: after it boots from the Enrollment Image it enrolls automatically and appears under Machines. Continue with Assign to a Machine Pool.
Other Virtualization Tools
VirtualBox
VirtualBox's default NAT networking mode does not allow the host to reach the VM. Since you typically need to access the Nest web UI from the host, this makes VirtualBox impractical for running a Nest without extra port-forwarding configuration.
Troubleshoot
ICMP Ping Warning During Network Validation (Hyper-V)
The Hyper-V Default Switch does not respond to ICMP pings on the primary gateway. If the ICMP ping check shows a warning during the Nest installer's network validation but ARP succeeds, this can be safely ignored.
Kubeadm Fails to Reach Its Own IP After Reboot
If the Foundry bootstrap fails after the installer has rebooted because kubeadm cannot reach its own IP, the hypervisor moved the VM to a different subnet. This can happen with both Hyper-V and VMware Workstation. See also Install Nest: Troubleshooting.
Nest Breaks After Host Reboot (Hyper-V)
The Default Switch assigns a new subnet after every host reboot, so the Nest's address no longer matches it and the Nest loses connectivity.
To make the Nest survive reboots, replace the Default Switch with a NAT switch that uses a fixed subnet. The NAT switch is not the default recommendation because New-NetNat can conflict with Docker Desktop and other software that creates its own NAT networks (on modern Windows with WSL2 and recent Docker Desktop for WSL this does not seem to be the case anymore), and it requires manual network configuration using PowerShell.
First, check whether a NAT network already exists (e.g. from Docker Desktop or other software). Only one WinNAT network can be active at a time:
Get-NetNatIf a NAT network is already configured (e.g. by Docker or another tool), New-NetNat below will succeed but likely not work, as only one WinNAT network can be active. In that case, this workaround cannot be used.
Create the NAT switch:
# create an internal switch and assign it a fixed gateway IP
New-VMSwitch -SwitchName "melt" -SwitchType Internal
$ifIndex = (Get-NetAdapter -Name "vEthernet (melt)").ifIndex
New-NetIPAddress -IPAddress 192.168.100.1 -PrefixLength 24 -InterfaceIndex $ifIndex
New-NetNat -Name "melt-nat" -InternalIPInterfaceAddressPrefix 192.168.100.0/24
Then connect the Nest VM to the melt switch:
Get-VM -Name "melt-nest" | Get-VMNetworkAdapter | Connect-VMNetworkAdapter -SwitchName "melt"During the Nest installation, use the following settings:
| Setting | Value |
|---|---|
| IP Address | 192.168.100.10 |
| Netmask | 255.255.255.0 |
| Gateway | 192.168.100.1 |
| DNS | 1.1.1.1 |
The melt switch and NAT rule persist across reboots, so the Nest will come back up with the same IP.
Machines on a NAT switch
Machines need an address while enrolling, either from DHCP or from IPAM, and the NAT switch provides neither. Since Machines also need connectivity to the Nest, they cannot stay on the Default Switch, which has no connectivity to the NAT switch. Create an External Switch (bridged to your physical network adapter) for Machines instead. They will get DHCP from your home/office router and can reach the Nest if it also has a NIC attached to that switch.
Reaching the Nest from WSL (Hyper-V)
WSL cannot directly reach VMs on the Hyper-V Default Switch (microsoft/WSL#11494). This affects tools like terraform, kubectl, and helm that you may want to run from a WSL shell.
Option A: WSL Mirrored Mode + Port Forwarding
Enable WSL mirrored networking and the experimental loopback feature by adding to %USERPROFILE%\.wslconfig (recent WSL versions also expose these in the WSL settings UI):
[wsl2]
networkingMode=mirrored

[experimental]
hostAddressLoopback=true
Restart WSL (wsl --shutdown), then set up a port forward from localhost to the Nest's IP (replace 172.x.x.x with your Nest's current IP on the Default Switch):
# forward the Foundry UI (port 8443) to localhost
netsh interface portproxy add v4tov4 listenport=8443 listenaddress=127.0.0.1 connectport=8443 connectaddress=172.x.x.x
In WSL, add a hosts entry so TLS certificates match:
echo "127.0.0.1 foundry.example.com" | sudo tee -a /etc/hostsThis allows terraform to reach the Foundry from WSL via https://foundry.example.com:8443. For kubectl or helm access, add a port forward for each control plane API server as well.
Option B: Use a NAT Switch
If you set up the NAT switch as described in Nest Breaks After Host Reboot (Hyper-V), WSL can reach the 192.168.100.0/24 subnet directly.
Reaching the Nest from WSL (VMware Workstation)
WSL can reach VMs on the VMware NAT network directly. However, WSL mirrored networking mode must be disabled for this to work (microsoft/WSL#11115).
Machine: Enrollment Issues
If the VM has trouble booting or enrolling, check the Enrollment Images: Troubleshooting section.